

TL;DR
The fastest way to connect Stripe to HubSpot is through HubSpot Commerce Hub — a native integration that syncs payment data in under 90 seconds after initial setup. For full subscription, MRR, and churn data, you need either a middleware layer (Zapier, Make) or a dedicated sync tool. This guide covers every method, the exact field mappings, workflow recipes, and the five errors that break most configurations.
Why Integrate Stripe and HubSpot
Stripe holds the ground truth on revenue: every payment, every failed charge, every subscription upgrade or churn event lives there first. HubSpot holds the ground truth on relationships: contact records, deal history, lifecycle stages, and sequences. Left unconnected, those two systems produce a gap — sales sees pipeline, finance sees transactions, and no one sees both at once.
When you connect Stripe to HubSpot, payment behavior becomes CRM signal. A failed payment becomes a workflow trigger. A subscription upgrade becomes an expansion deal. A three-month decline in payment volume becomes a churn-risk flag on a contact record — visible to the account manager before the customer cancels.
The operating case is straightforward: companies that sync billing data into their CRM in real time report 19% higher net revenue retention than those that reconcile data manually. The lag in manual processes is where expansion revenue and at-risk accounts fall through the cracks.
Three problems drive most integrations. First, sales does not know which prospects are already paying customers. Second, customer success cannot see payment health without logging into Stripe. Third, finance reconciles Stripe data manually against CRM deal amounts — a process that introduces errors and delays board-level reporting.
What Data Syncs Between Stripe and HubSpot
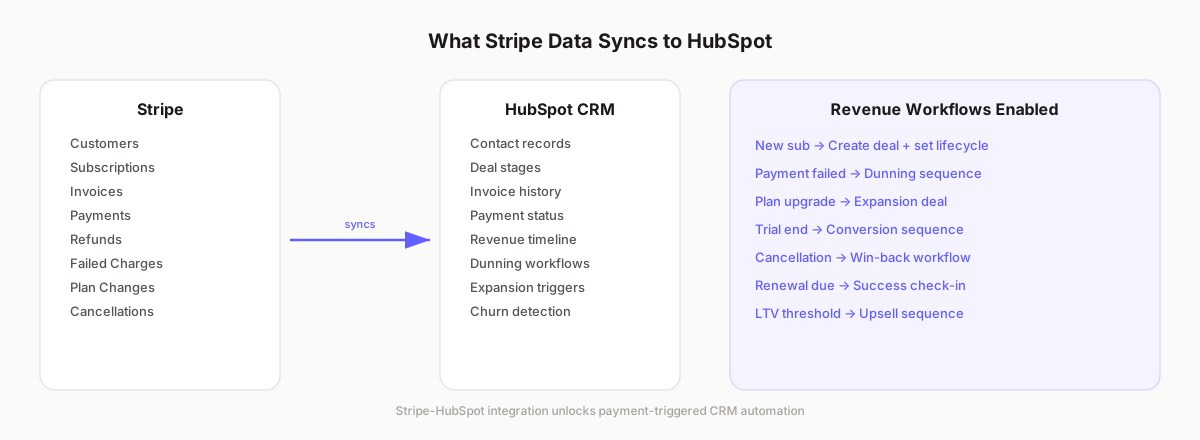
Not all Stripe data flows into HubSpot automatically. The native Commerce Hub integration handles a specific subset. Deeper sync — subscriptions, MRR, plan changes, churn events — requires additional configuration or middleware.
The table below shows what syncs at each integration tier. Understanding these tiers before you start saves you from discovering missing data three weeks into a workflow build.
Native Commerce Hub integration covers transaction-level payment data: gross amounts, fees, and payment status. It does not natively sync subscription lifecycle events — those require webhooks from Stripe routed to HubSpot via middleware or a custom integration layer.
For SaaS companies tracking MRR and churn, the native integration alone is not sufficient. The middleware approach — Zapier, Make, or a dedicated tool — is required to get subscription events, plan changes, and MRR calculations into contact and deal properties.
Native Commerce Hub Setup: Step-by-Step
HubSpot's native Stripe integration lives inside Commerce Hub. When connected, Stripe becomes the payment processor for HubSpot payment links, invoices, quotes, and subscriptions. Payment data from those transactions flows back to the associated deal or contact record automatically.
Prerequisites
- HubSpot Super Admin permissions — required to configure payment processors
- An active Stripe account with business details registered
- Company country must be on HubSpot's supported list (excludes Brazil, India, UAE, and several others)
- One Stripe account per HubSpot portal — multiple Stripe accounts on a single portal are not supported
- Sandbox, developer test, and partner demo accounts cannot connect Stripe
Step 1: Open Commerce Hub
In your HubSpot account, navigate to Commerce in the main left sidebar. Select Payments from the submenu. If no payment processor is currently connected, click the Set up payments button. If HubSpot Payments is currently active and you want to switch to Stripe, you must disconnect HubSpot Payments first — the option appears in Payments settings.
Step 2: Select Stripe as the Processor
On the payment processor selection screen, choose Integrate with a Stripe payment processing account and click Next. Select your company location from the dropdown. Confirm you accept the Stripe Payment Processing Terms and click Next again.
Step 3: Authenticate Your Stripe Account
HubSpot redirects you to Stripe. Enter the email address associated with your Stripe account and click Continue. Enter your password, complete two-factor authentication, and log in. If your business details are not yet registered in Stripe, complete that registration now. Otherwise, select the existing business from the list and click Connect.
Step 4: Review and Submit
Stripe displays a summary of your personal and business information. Review it, then scroll down and click Agree and submit. HubSpot redirects you back to the Commerce overview. You are now connected.
Step 5: Verify the Connection
Return to Commerce > Payments in HubSpot. The Stripe connection should display as active. Send a test payment link to yourself and complete a test transaction. Confirm the payment appears on the associated contact record under the Payments tab. If no payment record appears within five minutes, check the sync log under Settings > Integrations > Connected Apps > Stripe.
Important Limitation
Invoices and subscriptions you create inside HubSpot will not be pushed back into Stripe as Stripe-native objects. The data flow is one-directional for transaction records: Stripe payment events surface in HubSpot, but HubSpot-originated invoices do not create parallel Stripe invoice objects unless you use a custom API integration.
Zapier and Make: When and How to Use Them
The native Commerce Hub integration covers payment transaction data. It does not expose Stripe's subscription lifecycle events — customer.subscription.created, customer.subscription.updated, customer.subscription.deleted, invoice.payment_failed — to HubSpot automatically. For SaaS operators who need MRR, churn signals, and plan-change data inside HubSpot CRM, middleware is required.
Zapier and Make both support Stripe trigger events and HubSpot actions. The right choice depends on your volume and workflow complexity.
When Zapier Works Well
Zapier suits teams below 500 active subscriptions per month. It handles straightforward trigger-action patterns: new Stripe subscription creates a HubSpot deal, failed payment updates a contact property, subscription cancelled moves a deal stage. Setup requires no code. Zapier's Stripe integration supports all major webhook event types. The primary limitation is that Zapier processes one record at a time, and at high volumes the task usage cost becomes significant.
Setting Up a Zapier Zap: Stripe to HubSpot
- Create a new Zap. Select Stripe as the trigger app.
- Choose the event type — for subscription sync, select New Subscription or Customer Subscription Updated.
- Connect your Stripe account and test the trigger. Zapier pulls a recent subscription record to use as sample data.
- Add a HubSpot action step. For new subscriptions, choose Create or Update Contact.
- Map Stripe fields to HubSpot contact properties. At minimum: stripe_customer_id to a custom HubSpot text property, customer.email to Contact email, and subscription.status to a custom status property.
- Add a second action step: Create Deal in HubSpot. Map subscription.items.data[0].price.unit_amount (divided by 100) to the Deal Amount field. Set Deal Stage to Closed Won.
- Turn on the Zap and test with a real or test-mode Stripe event.
When Make Works Better
Make (formerly Integromat) handles branching logic that Zapier cannot. If you need to route subscription events differently — SMB deals to one pipeline, enterprise deals to another, based on Stripe price ID — Make's scenario builder handles conditional routing natively. Make also processes in near-real-time and costs less per operation at scale. The trade-off is a steeper setup learning curve.
Setting Up a Make Scenario: Failed Payment to HubSpot Workflow
- Create a new scenario. Add the Stripe module — Watch Events — and select invoice.payment_failed as the event type.
- Register the webhook in your Stripe dashboard under Developers > Webhooks. Paste the Make webhook URL provided in the module setup.
- Add a Router module. Create two branches: one for the first payment failure, one for repeat failures.
- In the HubSpot branch for first failure: Search Contacts by email using the Stripe customer email. Update the contact's Payment Status property to Payment Failed.
- Add an Enroll in Workflow action to enroll the contact in your dunning sequence. Map the contact ID from the search result.
- In the repeat failure branch: Update the associated deal stage to At Risk. Create a task for the assigned CSM.
- Run the scenario once with a Stripe test event. Confirm the contact update and workflow enrollment in HubSpot.
Field Mapping Best Practices
Incorrect field mappings are the source of most integration failures. The symptoms — duplicate contacts, missing MRR values, deals with zero amounts — all trace back to mapping decisions made at setup. Getting these right the first time saves hours of cleanup.
The Deduplication Key
Email address is HubSpot's default deduplication key. It works in most cases but fails when a customer uses different email addresses in Stripe and HubSpot. The fix is to create a custom HubSpot contact property called Stripe Customer ID and map it to the Stripe customer.id field. This secondary dedup key allows your integration to locate the correct HubSpot contact even when email addresses differ.
Core Field Mappings
Creating Custom Properties in HubSpot
Before your integration can write Stripe data to HubSpot, the target properties must exist. Navigate to Settings > Properties in HubSpot. Create the following custom contact properties: Stripe Customer ID (single-line text), Subscription Status (single-line text or dropdown), Plan Name (single-line text), MRR (number), Renewal Date (date), and Payment Status (dropdown with values: Active, Failed, Cancelled, Paused).
For deals, create: Stripe Subscription ID (single-line text) and Subscription Start Date (date). These properties allow you to trace each HubSpot deal back to its source Stripe subscription without opening Stripe directly.
Using Stripe Data for HubSpot Workflows
The integration becomes operationally valuable when Stripe events trigger HubSpot workflows. Static contact property updates are useful — automated sequences triggered by payment behavior are where the revenue impact concentrates.
Workflow 1: New Subscription Onboarding
When a new Stripe subscription is created, a HubSpot contact should move to the Customer lifecycle stage and enter an onboarding sequence. Build this workflow with three nodes: a contact-based enrollment trigger (Subscription Status = Active and was not Active before), a lifecycle stage update to Customer, and a sequence enrollment for your onboarding track. Add a task creation at Day 7 to check onboarding progress.
Workflow 2: Failed Payment Dunning
Failed payments are the highest-leverage workflow to automate. Without automation, 18 to 24 percent of failed payment revenue is recovered. With an automated dunning sequence, recovery rates reach 42 to 67 percent. Build the workflow: enrollment trigger is Payment Status = Failed. Send an immediate payment issue notification email. At 24 hours, send a reminder and create a CS task. At 72 hours, send an account-at-risk email and notify the CSM via Slack or HubSpot notification. At four failures, update the deal stage to At Risk.
Workflow 3: Expansion Revenue Capture
When a Stripe subscription upgrades to a higher plan, create an expansion deal in HubSpot. The trigger is Plan Name changed to a higher-tier price ID. Actions: create a new deal in a Renewals or Expansion pipeline, set the deal amount to the difference between old and new MRR, notify the account executive, and enroll the contact in an upsell confirmation sequence.
Workflow 4: Churn Risk Detection
When a Stripe subscription cancellation event fires (customer.subscription.deleted), update the HubSpot contact lifecycle stage to Former Customer. Create a win-back task for the CSM assigned to the account. Optionally enroll the contact in a win-back email sequence with a 30-day delay. Track win-back conversion rate as a standalone metric — it tells you how many churned customers you bring back and at what cost.
Building MRR and Revenue Reporting in HubSpot
Once Stripe subscription data flows into HubSpot contact and deal properties, you can build revenue reports that do not require exporting to a spreadsheet. The reports below are the ones SaaS operators use most — and the ones that produce the fastest operating decisions.
MRR by Contact Property
Create a single-object contact report. Group by Plan Name. Sum the MRR property. This produces a plan-level MRR table: how much revenue sits on each tier, visible to sales and CS without a Stripe login. Filter by Subscription Status = Active to exclude cancelled accounts from the sum.
Churn Rate Dashboard
Create a contact report that counts contacts where Subscription Status changed to Cancelled in the last 30 days. Divide by the total count of contacts where Subscription Status was Active at the start of that period. This gives you a monthly customer churn rate. For revenue churn, sum the MRR of cancelled contacts divided by beginning-of-period MRR.
Failed Payment Exposure
Build a report that sums MRR across all contacts where Payment Status = Failed. This is your at-risk revenue number — the total subscription value that could churn if dunning sequences do not recover the payment. Surfacing this number weekly in your operating review changes how the team prioritizes CS outreach.
If you need board-level MRR reporting — new MRR, expansion MRR, churned MRR, net new MRR waterfall — HubSpot's native reports are not fully sufficient. You need either a dedicated RevOps tool or a data layer that normalizes Stripe events into a structured MRR model before reporting.
Common Errors and How to Fix Them
The five errors below account for the majority of Stripe-HubSpot integration failures. Each one has a deterministic fix that takes under 30 minutes once identified.
Error 1: Duplicate Contacts
Symptom: a customer appears as two separate HubSpot contacts after the integration runs. Cause: the customer has different email addresses in Stripe (billing email) and HubSpot (sales contact email). Fix: add Stripe Customer ID as a secondary deduplication property. In your Zapier or Make configuration, search for existing HubSpot contacts by Stripe Customer ID before creating a new record. Merge any duplicates already created using HubSpot's built-in contact merge tool.
Error 2: MRR Not Updating After Plan Changes
Symptom: the MRR contact property shows the original subscription amount and does not update when the customer upgrades or downgrades. Cause: the webhook for customer.subscription.updated is not registered or is inactive. Fix: open Stripe Dashboard > Developers > Webhooks. Confirm the endpoint URL is active and that customer.subscription.updated is included in the event list. If using Zapier, check that the Subscription Updated trigger is a separate Zap from the Subscription Created trigger — they are different event types and require separate Zap configurations.
Error 3: Deals Created in the Wrong Pipeline
Symptom: new subscription deals appear in the default HubSpot pipeline instead of the intended Renewals or SaaS pipeline. Cause: the pipeline ID is not specified in the HubSpot Create Deal action — HubSpot defaults to the first pipeline. Fix: in your integration configuration, open the Create Deal action and explicitly select the target pipeline from the pipeline dropdown. If you route SMB and enterprise deals to different pipelines, add a Filter/Router step that checks the subscription price ID or amount before routing to the deal creation action.
Error 4: Sequences Not Triggering on Failed Payments
Symptom: the Payment Status contact property updates to Failed but the enrollment into the dunning sequence does not occur. Cause: either the contact email is invalid (preventing sequence enrollment) or the sequence is paused. Fix: add a validation step in Make or Zapier that checks whether the contact email is populated before attempting enrollment. Confirm the target sequence is active in HubSpot under Automation > Sequences. If the sequence is active and email is valid, check that the HubSpot user account tied to your Private App has the Sequences permission — some plans require it to be explicitly granted.
Error 5: Historical Sync Creates Duplicate Deals
Symptom: running a historical backfill of Stripe subscriptions into HubSpot creates duplicate deals for customers who already have a deal in the pipeline. Cause: the deduplication logic is not checking for existing deals before creating new ones. Fix: before running a historical sync, configure a lookup step that searches HubSpot for a deal where Stripe Subscription ID matches the subscription being imported. If a deal is found, update it. If no deal is found, create it. Running the sync without this lookup step on a large account will require significant manual cleanup.
Choosing the Right Integration Method
The right approach depends on your subscription volume, workflow complexity, and how much engineering time you can allocate. Below is a decision framework based on three primary configurations.
Option A: Native Commerce Hub Only
Best for: e-commerce or service businesses using Stripe for one-time payments. Commerce Hub gives you payment transaction data on contact records and deal records. Subscriptions, MRR, and lifecycle events are not available. Setup time is under 20 minutes. No ongoing maintenance required.
Option B: Commerce Hub Plus Zapier or Make
Best for: SaaS companies below $1M ARR or 500 active subscriptions. Commerce Hub handles payment transactions. Zapier or Make handles subscription events, MRR updates, and lifecycle automations. Total setup time is three to eight hours. Ongoing cost is the Zapier or Make subscription — typically $49 to $99 per month at this scale. The limitation is that Zapier and Make lack native MRR transformation logic. You calculate MRR manually in the field mapping (price.unit_amount divided by 100 for monthly, divided by 1200 for annual converted to monthly).
Option C: Custom API Integration
Best for: companies above $1M ARR, multi-product Stripe configurations, or where MRR accuracy directly affects board reporting. A custom integration uses Stripe's Restricted API Keys and HubSpot's Private Apps to build a direct webhook-to-CRM pipeline. This approach supports full event backfill (12 months of historical subscription data), sub-90-second sync latency, and complex routing logic. Engineering time is 20 to 40 hours to build, plus ongoing maintenance. For companies at this scale, the reporting accuracy improvement — from 60-70% to 95%+ — justifies the build cost.
A fourth option is a purpose-built RevOps platform that handles the Stripe-HubSpot connection as part of a broader operating data layer. This removes the build-and-maintain burden entirely and delivers MRR, churn, and pipeline data in one place — without requiring internal engineering time.
Key Takeaways
- →The native Commerce Hub integration connects Stripe as a payment processor. It syncs transaction data but not subscription lifecycle events or MRR.
- →For SaaS companies, Zapier or Make is required to sync subscription status, MRR, plan changes, and churn signals into HubSpot CRM.
- →The Stripe Customer ID field is the critical deduplication key. Map it as a custom HubSpot contact property at setup — not as an afterthought.
- →Failed payment dunning workflows recover 42 to 67 percent of at-risk revenue compared to 18 to 24 percent with manual follow-up.
- →The five most common errors — duplicate contacts, stale MRR, wrong pipeline, sequences not triggering, backfill duplicates — each have a deterministic fix that takes under 30 minutes.
- →Companies above $1M ARR benefit from a custom API integration or a dedicated RevOps data layer to achieve 95%+ CRM accuracy and board-ready MRR reporting.