

TL;DR
- Native connector: QuickBooks Online includes a free Shopify Connector app. It syncs orders, payouts, taxes, and customer data in under 10 minutes of setup.
- Better option for scale: A2X or Synder create summarized journal entries per payout, match bank deposits exactly, and handle fees, refunds, and sales tax correctly.
- Inventory sync: The native connector does not sync inventory. Webgility or Synder handle two-way stock updates.
- Common problems: Revenue mismatches come from timing differences, unmapped fees, and mishandled refunds. All three are avoidable with proper account mapping.
- After connecting: Review your chart of accounts, set the correct income account for Shopify sales, and verify the first payout reconciliation before trusting automated reports.
Your Shopify store processes hundreds of orders. Your accountant needs those numbers in QuickBooks. Between those two facts sits a manual data entry problem that costs operators hours every month — and introduces errors that take days to untangle at quarter end.
Connecting Shopify to QuickBooks eliminates that manual loop. Orders, fees, refunds, taxes, and payouts flow automatically into your accounting software. Your P&L reflects actual revenue. Your reconciliation takes minutes instead of days.
This guide covers every method to connect Shopify to QuickBooks Online, the exact steps for the native QBO Connector, how to choose a third-party integration tool, the account mapping decisions that matter, and the common errors that break reconciliation. By the end, your Shopify data will be in QuickBooks without a spreadsheet in sight.
Why connecting Shopify to QuickBooks matters
Manual bookkeeping for a Shopify store looks manageable at 50 orders per month. At 500 orders, it becomes a part-time job. At 5,000 orders, it is impossible without automation.
Each Shopify order contains multiple financial components: gross revenue, sales tax collected, shipping income, discount codes applied, Shopify payment fees, and the net deposit to your bank account. Without integration, every one of those components requires a manual entry in QuickBooks. One missed line creates a discrepancy that compounds across every subsequent reconciliation.
The practical consequences are real. Inaccurate books mean unreliable P&L reports. Unreliable P&L reports mean decisions made on bad data. Operators who connect Shopify to QuickBooks correctly report a specific outcome: they stop spending two to four hours per week on data entry and start spending that time reading financial reports instead of building them.
Three methods to connect Shopify to QuickBooks
There is no single right method for every store. The best approach depends on your order volume, whether you need inventory sync, and how precise your reconciliation requirements are.
Method 1: Native QuickBooks Shopify Connector
QuickBooks Online includes a free Shopify Connector built by Intuit. It syncs orders, payouts, taxes, and customer data from your Shopify store directly into QuickBooks. Setup takes under 10 minutes. There are no additional fees beyond your QuickBooks subscription.
The native connector works well for stores processing under 100 to 200 orders per month with straightforward accounting needs. It does not sync inventory, does not support multi-channel setups, and has limited account mapping options. For most early-stage Shopify stores, it is the right starting point.
Method 2: Accounting automation apps (A2X, Synder)
A2X and Synder are purpose-built Shopify-to-QuickBooks connectors designed for accounting accuracy. Both apps create summarized journal entries per payout — not per individual order — which means your QuickBooks records match bank deposits exactly. This is the architecture most accountants prefer.
A2X starts at $19 per month for stores with under 200 orders. Synder starts at $11 per month. Both handle fees, refunds, discounts, gift cards, and sales tax with configurable mapping. For stores processing more than 200 orders per month, or for any store using accrual accounting, these tools are worth the cost.
Method 3: Zapier or manual entry
Zapier can push individual Shopify orders into QuickBooks as they occur. This approach is low cost but creates high transaction volume inside QuickBooks — one entry per order rather than one entry per payout. At any meaningful scale, this overwhelms QuickBooks and makes reconciliation harder, not easier. Manual CSV export and import carries the same problem plus human error at every step.
Method 3 is appropriate for stores with fewer than 20 orders per month and no growth plans. For anything else, Method 1 or Method 2 produces better results with less ongoing maintenance.
How to connect Shopify to QuickBooks using the native connector
The steps below cover the native QuickBooks Online Shopify Connector. If you choose A2X or Synder, their respective setup wizards follow a similar pattern but with additional account mapping screens.
Step 1: Log in to QuickBooks Online
Open QuickBooks Online and log in with your account. You need a QuickBooks Online Essentials, Plus, or Advanced subscription. The Simple Start plan does not support the Shopify integration.
Step 2: Navigate to Integrations
From the left navigation, click Commerce or go to Apps → Find Apps and search for "Shopify Connector by QuickBooks." Select the app and click Get integration now. You will be prompted to enter your Shopify store URL in the format mystore.myshopify.com.
Step 3: Authorize the connection
Click Connect, review the permissions screen, and click Continue. You will be redirected to Shopify to authorize the integration. Sign in to your Shopify admin and click Authorize Access. Shopify will redirect you back to QuickBooks to complete the configuration.
Step 4: Configure import settings
After authorization, QuickBooks presents three key settings:
- Import start date: Select the date from which QuickBooks imports orders. You can go back up to one year. For new connections, use the first day of your current fiscal year.
- Deposit account: Select the bank account where Shopify payouts land. This must match your actual bank account in QuickBooks exactly.
- Customer tracking: Choose whether to sync individual customer records from Shopify. For stores with large customer lists, turning this off reduces clutter in your QuickBooks contacts.
Step 5: Run the initial sync
Click Sync Now. QuickBooks begins importing historical orders based on your selected start date. The initial import takes between 10 minutes and 3 hours depending on transaction volume. You will receive a notification when the import completes.
Step 6: Verify the first payout reconciliation
Before trusting any automated reports, verify the first payout. In QuickBooks, go to Commerce → Overview and check that the deposit amount matches your bank statement exactly. If the amounts differ, the most likely cause is an unmapped fee category or a refund that was not handled correctly during import.
What data flows from Shopify to QuickBooks
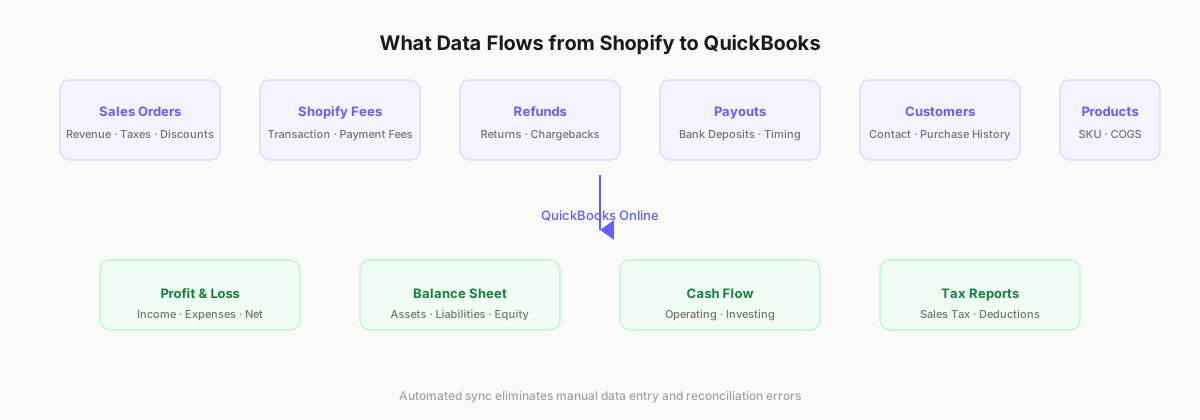
A complete Shopify-to-QuickBooks integration syncs six categories of data. Understanding what each category contains — and where it maps in QuickBooks — prevents the account mapping errors that cause reconciliation failures.
What syncs from Shopify to QuickBooks
- Sales orders: Gross revenue, item prices, discounts applied, and sales tax collected. Maps to your income account and sales tax liability account.
- Shopify fees: Subscription fees, transaction fees (0.5%–2%), and credit card processing fees. Map to a dedicated "Shopify Fees" expense account to keep them visible in your P&L.
- Refunds and chargebacks: Returned orders reduce gross revenue. Chargebacks carry an additional fee. Both need accurate mapping to avoid overstating income.
- Payouts: Net deposits from Shopify Payments to your bank account. Each payout is a single bank deposit that combines multiple days of orders minus fees and refunds.
- Customers: Contact names, emails, and purchase history. Useful for customer-level P&L analysis and accounts receivable tracking.
- Products: SKU codes, descriptions, and prices. Required for inventory sync and COGS tracking when using third-party tools.
Account mapping: the decisions that matter
Account mapping is the most common source of Shopify-QuickBooks integration problems. Getting it right during setup prevents weeks of reconciliation work later. Getting it wrong means every report is slightly — sometimes significantly — inaccurate.
These are the four mapping decisions that affect financial accuracy most directly:
Income account
All Shopify sales should map to a single income account — typically "Sales Revenue" or "Shopify Sales" in your chart of accounts. If you sell across multiple product categories with different margins, you may want to create sub-accounts by category (e.g., "Sales — Apparel," "Sales — Accessories") to track gross margin by product line inside QuickBooks.
Shopify Payments fees
Payment processing fees (2.4%–2.9% plus $0.30 per transaction for most Shopify Payments plans) are deducted from your payouts before the money reaches your bank. These need to map to an expense account — not be netted against revenue. Creating a dedicated "Payment Processing Fees" expense line keeps this cost visible in your operating margin calculations.
Sales tax liability
Sales tax collected from customers is a liability, not revenue. It belongs in a "Sales Tax Payable" liability account, not in your income account. Misclassifying sales tax as revenue inflates your reported income and creates a tax reconciliation problem at filing time. The native connector handles this correctly by default, but verify the mapping if you have previously set up custom rules.
Refund handling
Refunds reduce gross revenue. In QuickBooks, they typically post as a credit memo against the original income account. If your integration creates refunds as expenses rather than income reductions, your gross margin will be understated. Check the first few refund entries after setup to confirm correct classification.
Connecting Shopify to QuickBooks Desktop
The native QBO Connector and most third-party apps (A2X, Synder) are designed for QuickBooks Online, not QuickBooks Desktop. If you use QuickBooks Desktop (Pro, Premier, or Enterprise), your integration options are more limited.
The main options for QuickBooks Desktop integration are:
- Transaction Pro Importer: Imports Shopify order exports as IIF files into QuickBooks Desktop. Requires manual CSV export from Shopify, transformation, and import. Not automated.
- Webgility: Supports QuickBooks Desktop with two-way sync including inventory. Starts at $39 per month and requires the Webgility Desktop Agent installed on the same computer as QuickBooks.
- Migration to QuickBooks Online: Many operators using QuickBooks Desktop for Shopify integration choose this as the long-term path. QuickBooks Online supports far more integration options and is updated continuously by Intuit.
If you manage a large Shopify operation and are still on QuickBooks Desktop, the migration investment to QuickBooks Online typically pays back within two to three months in reduced manual work. For operators managing multiple data connections, see how connected data across your stack compares to managing each integration separately.
Common errors and how to fix them
Most Shopify-QuickBooks integration problems fall into five categories. Each has a clear cause and a clear fix.
Revenue mismatch between Shopify and QuickBooks
The most common complaint: "My QuickBooks revenue does not match my Shopify dashboard." The cause is almost always a timing difference. Shopify reports revenue when an order is placed. QuickBooks records revenue when a payout is processed — which may be two to five days later. The solution is to align your reporting period to payout dates or use an accounting app that handles accrual timing correctly.
Duplicate transactions
Duplicate entries appear when an integration is set up more than once, when an import overlap exists between the historical import and live sync, or when a Zapier automation runs alongside a native connector. Fix this by identifying the overlap date in QuickBooks, deleting duplicate entries for that period, and ensuring only one sync method is active at a time.
Sales tax recorded as income
If sales tax is mapped to your income account instead of a liability account, your revenue will be overstated by the amount of tax collected. In the QuickBooks integration settings, verify that the "Sales Tax" line maps to "Sales Tax Payable" (liability), not to any income account. Correct the mapping and re-run the affected periods.
Missing Shopify fees
The native connector imports net payouts without always creating separate line items for each fee category. If you see a single deposit amount with no corresponding fee expense, your cost of accepting payments is hidden inside net revenue. Switch to A2X or Synder to get fee-level visibility, or manually create a journal entry for the fee amount each period using your Shopify Payments reports as the source.
Refunds not reconciling
Refunds processed in Shopify reduce the net payout for the period in which they are processed, not necessarily the period in which the original order was placed. If your integration does not handle this timing correctly, refunds appear as unexplained reductions in a later period's payout. A2X handles payout-period refund mapping by default, which is one reason it is preferred by e-commerce accountants.
Choosing between A2X and Synder
A2X and Synder are both strong choices for Shopify-to-QuickBooks integration above the basic level. The differences are meaningful for operators who care about reporting precision.
| Feature | A2X | Synder |
|---|---|---|
| Sync method | Summarized payout entries | Transaction-level or summary |
| Bank deposit matching | Exact payout match | Configurable |
| Inventory sync | No | Yes |
| Multi-channel support | Amazon, eBay, Etsy, Shopify | Shopify, Stripe, PayPal, Square |
| Starting price | $19/month | $11/month |
| Best for | Accrual accounting, multi-channel | Inventory tracking, real-time sync |
The choice between the two often comes down to accounting method. Stores on cash-basis accounting that want real-time transaction sync often prefer Synder. Stores on accrual accounting that need payout-period reconciliation tend to prefer A2X. When in doubt, the payout-based architecture of A2X is more forgiving for accountants who need to match bank statements precisely.
Best practices after connecting Shopify to QuickBooks
The integration setup is the beginning, not the end. These practices keep the connection accurate and your books clean as your store scales.
Reconcile weekly, not monthly
Weekly reconciliation catches errors when they are small. Monthly reconciliation catches them when they are compounded. Set a standing 30-minute block each Monday to verify that the prior week's Shopify payouts match the QuickBooks bank feed. Use the weekly operating report framework to build this check into your regular operating cadence.
Monitor for integration errors
Most Shopify connectors — both native and third-party — have an error log or notification system. Enable email alerts for sync failures. A failed sync on a high-volume day can create a gap in your books that is hard to identify two weeks later when your reconciliation does not balance. Catching failures within 24 hours means a five-minute fix. Catching them two weeks later means a half-day investigation.
Keep your chart of accounts clean
Integration apps create accounts in QuickBooks if the target accounts do not already exist. Over time, this can produce duplicates — "Shopify Sales," "Sales — Shopify," and "Shopify Revenue" all representing the same income stream. Audit your chart of accounts every quarter. Merge duplicates. A clean chart of accounts produces clean P&L reports without manual adjustment.
Review settings after Shopify plan changes
When you change your Shopify subscription plan, your payment processing fee rate changes. When you add a new payment gateway, the integration may require a new mapping. After any Shopify account change, verify that the fee rates in your integration settings reflect the new rates. Otherwise your expense tracking understates the true cost of accepting payments.